82,243 total views, 3 views today
超音波距離センサと赤外線近接センサを使って障害物を避けて走るクローラー車を作った。
いろいろと試行錯誤した結果、いい感じに調整できたので紹介する。
スマホで操作できるオムニホイールのWi-Filラジコンカーを3Dプリンターで作った(ESP32)
Arduino Uno互換機を使ってメカナムホイールのラジコンカーを作った
スマホで操作できるメカナムホイールのWi-Fiラジコンカーを作った(ESP-WROOM-02)
目次
障害物を避ける動作
- 障害物との距離が20cm未満の場合:障害物と反対方向に緩やかに曲がる(赤LED点灯)
- 障害物との距離が15cm未満の場合:障害物と反対方向に急角度で曲がる(赤LED点灯)
- 障害物との距離が8cm未満の場合:一旦バックしてから左右どちらかにランダムで転回する(赤LED点滅)
なお、モーターにセラミックコンデンサをつけなかった場合には、モーターの低回転時の動作が上手くいかなかった(モーターの回転が止まってしまう)ので、やはりノイズ除去の対策は必要なのだと思った。
使用品一覧
| 品名 | 用途 |
|---|---|
| Arduino Uno(互換機) | クローラー車の動作制御 |
| 超音波距離センサ(HC-SR04) | 障害物検知 |
| 赤外線近接センサ(LM393) | 障害物検知の補助 |
| サーボモータ(HS-422もしくはSG90) | 超音波距離センサの検知方向制御 |
| モーターシールド | モーターの動作制御 |
| LED(緑、赤) | クローラー車の動作確認用 |
| ユニバーサル基板 | 超音波距離センサとLEDの実装 |
| 抵抗(200Ω) | LED用 |
| セラミックコンデンサ(0.01μF) | モーターのノイズ除去用 |
| ジャンパーワイヤ(メス-メス) | 配線用 |
| ジャンプワイヤキット | ユニバーサル基板上の配線用 |
| 耐熱ビニル絶縁電線 | モーターの配線用 |
| タミヤ 楽しい工作シリーズ 透明 ユニバーサルプレートセット 2枚セット | 車体 |
| タミヤ 楽しい工作シリーズ トラック&ホイールセット | クローラー |
| タミヤ 楽しい工作シリーズ ツインモーターギヤーボックス | モーター |
| タミヤ 楽しい工作シリーズ ユニバーサルアームセット | 車体 |
| モバイルバッテリー | 電源(Arduino Uno互換機用) |
| 電池ボックス(単3×4本、スイッチ付) | 電源(モーター用) |
組み立て
車体
タミヤのユニバーサルプレートとトラック&ホイールセットを使って、まずは車体を作った。
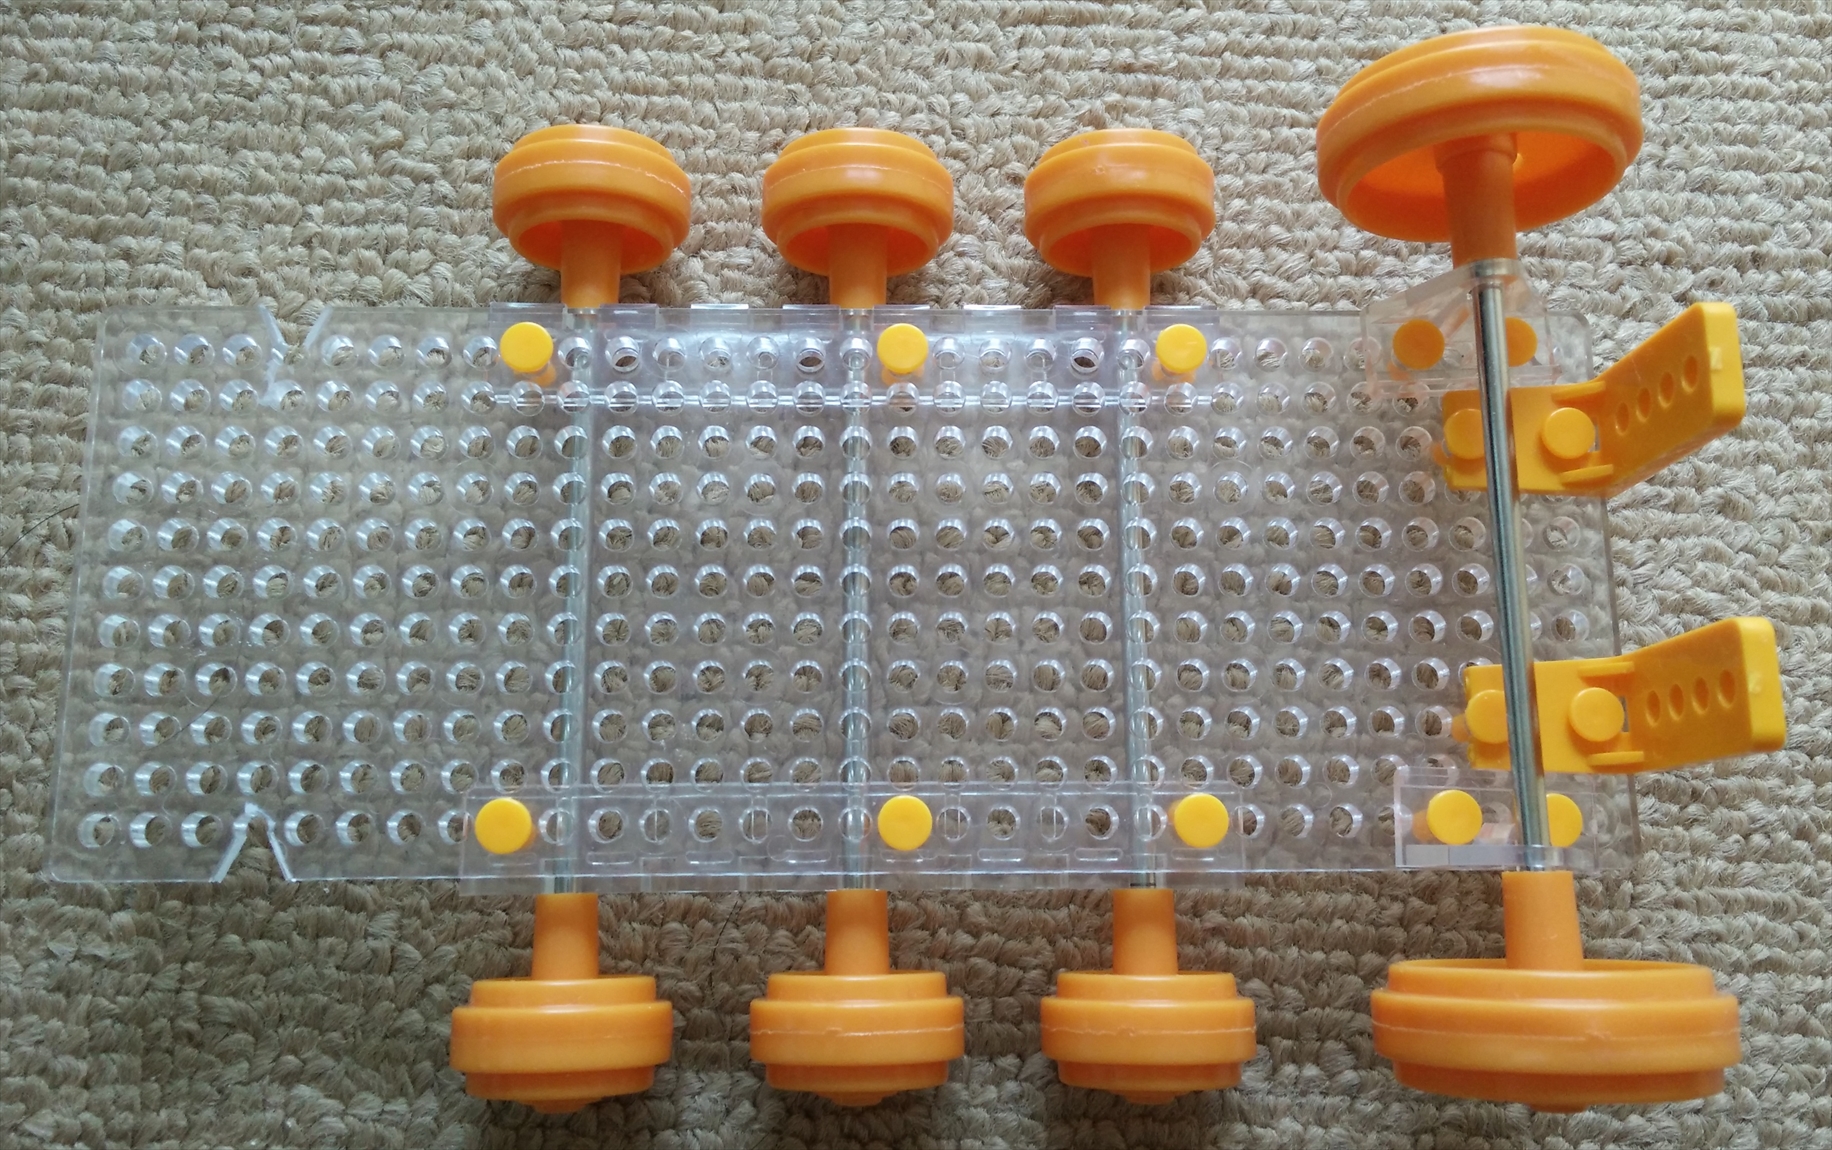 (車体:表)
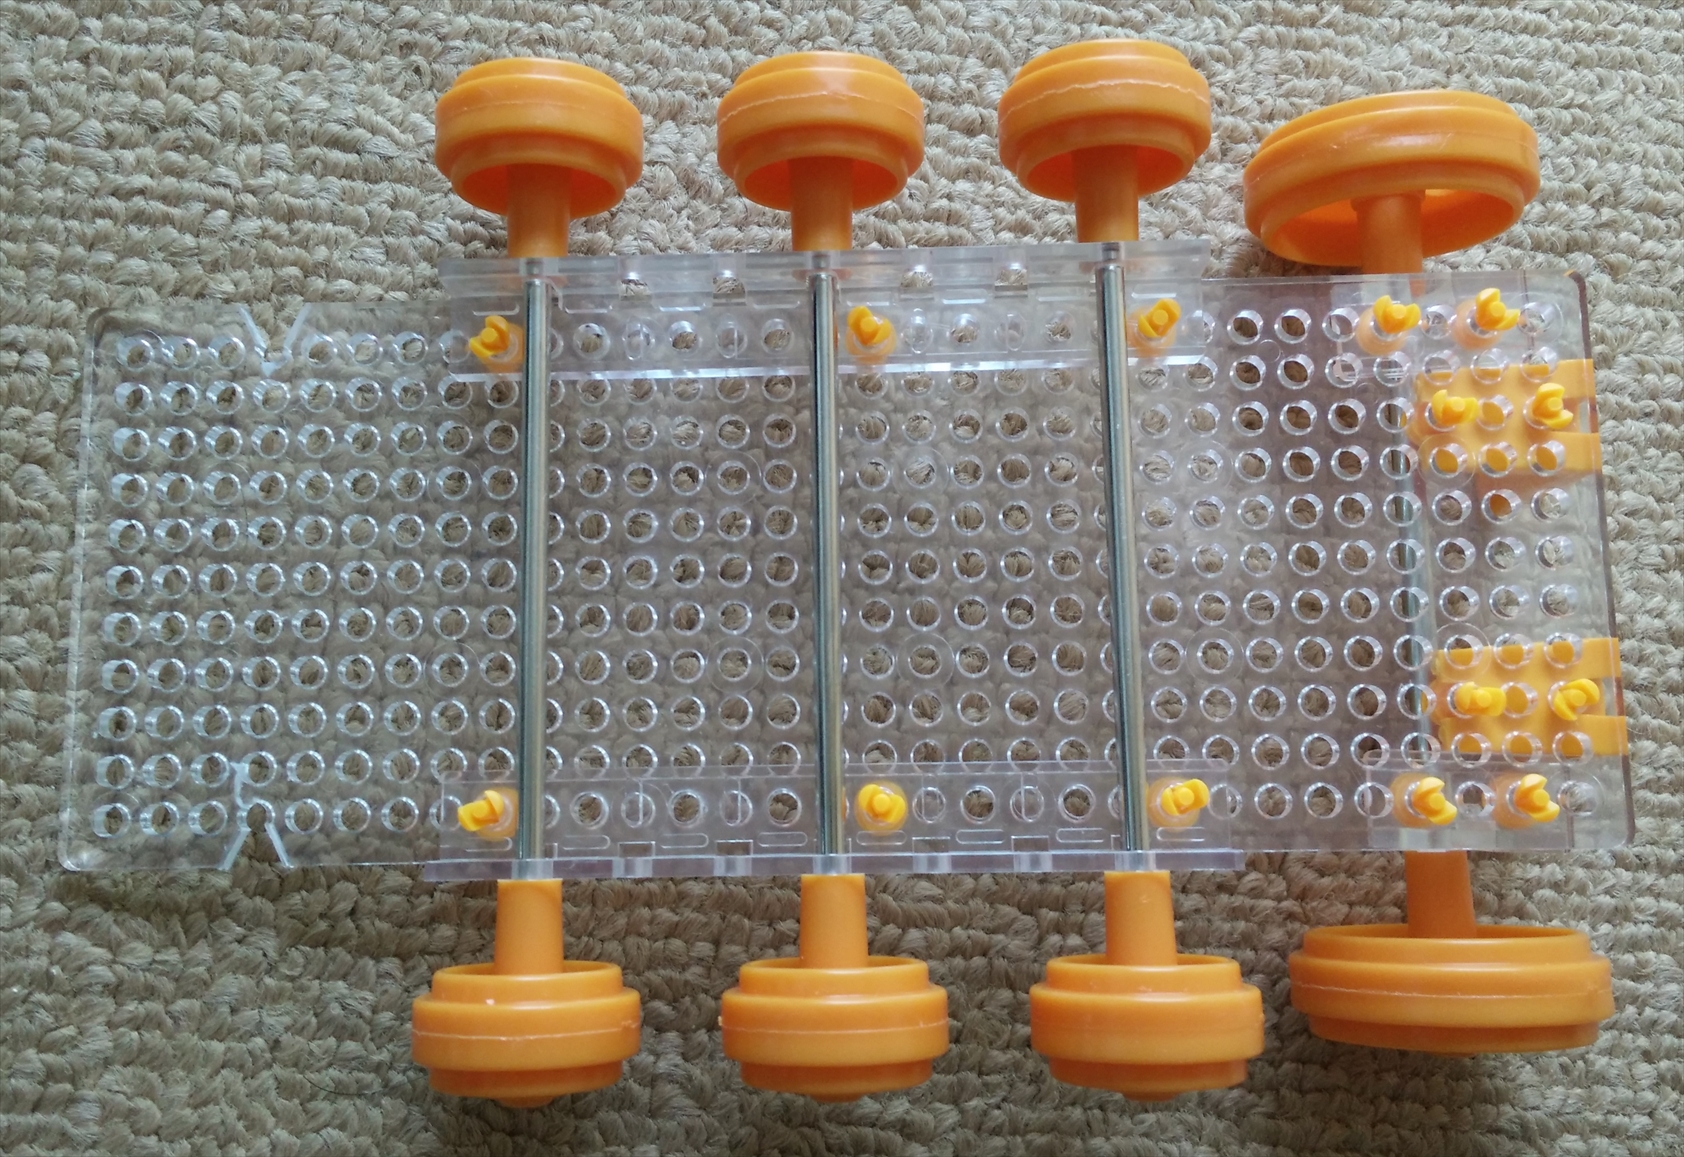 (車体:裏)
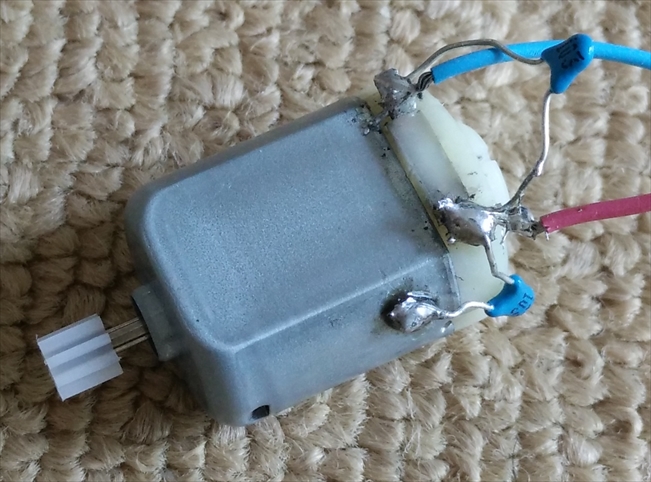
タミヤのダブルギヤボックスの場合には、ツインモーターギヤボックスと違って、モーターを固定するためのパーツがあるのだが、モーターのボディー部にセラミックコンデンサを半田付けした場合、その固定パーツは使えなくなる。
なので、セラミックコンデンサを使う場合には、ダブルギヤボックスよりもツインモーターギヤボックスの方が良い。
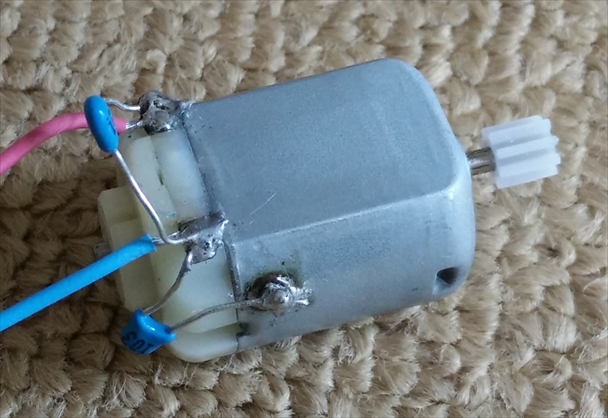
(モーターの配線とセラミックコンデンサの半田付け×2)
 (ギアボックスを車体に取り付け:表)
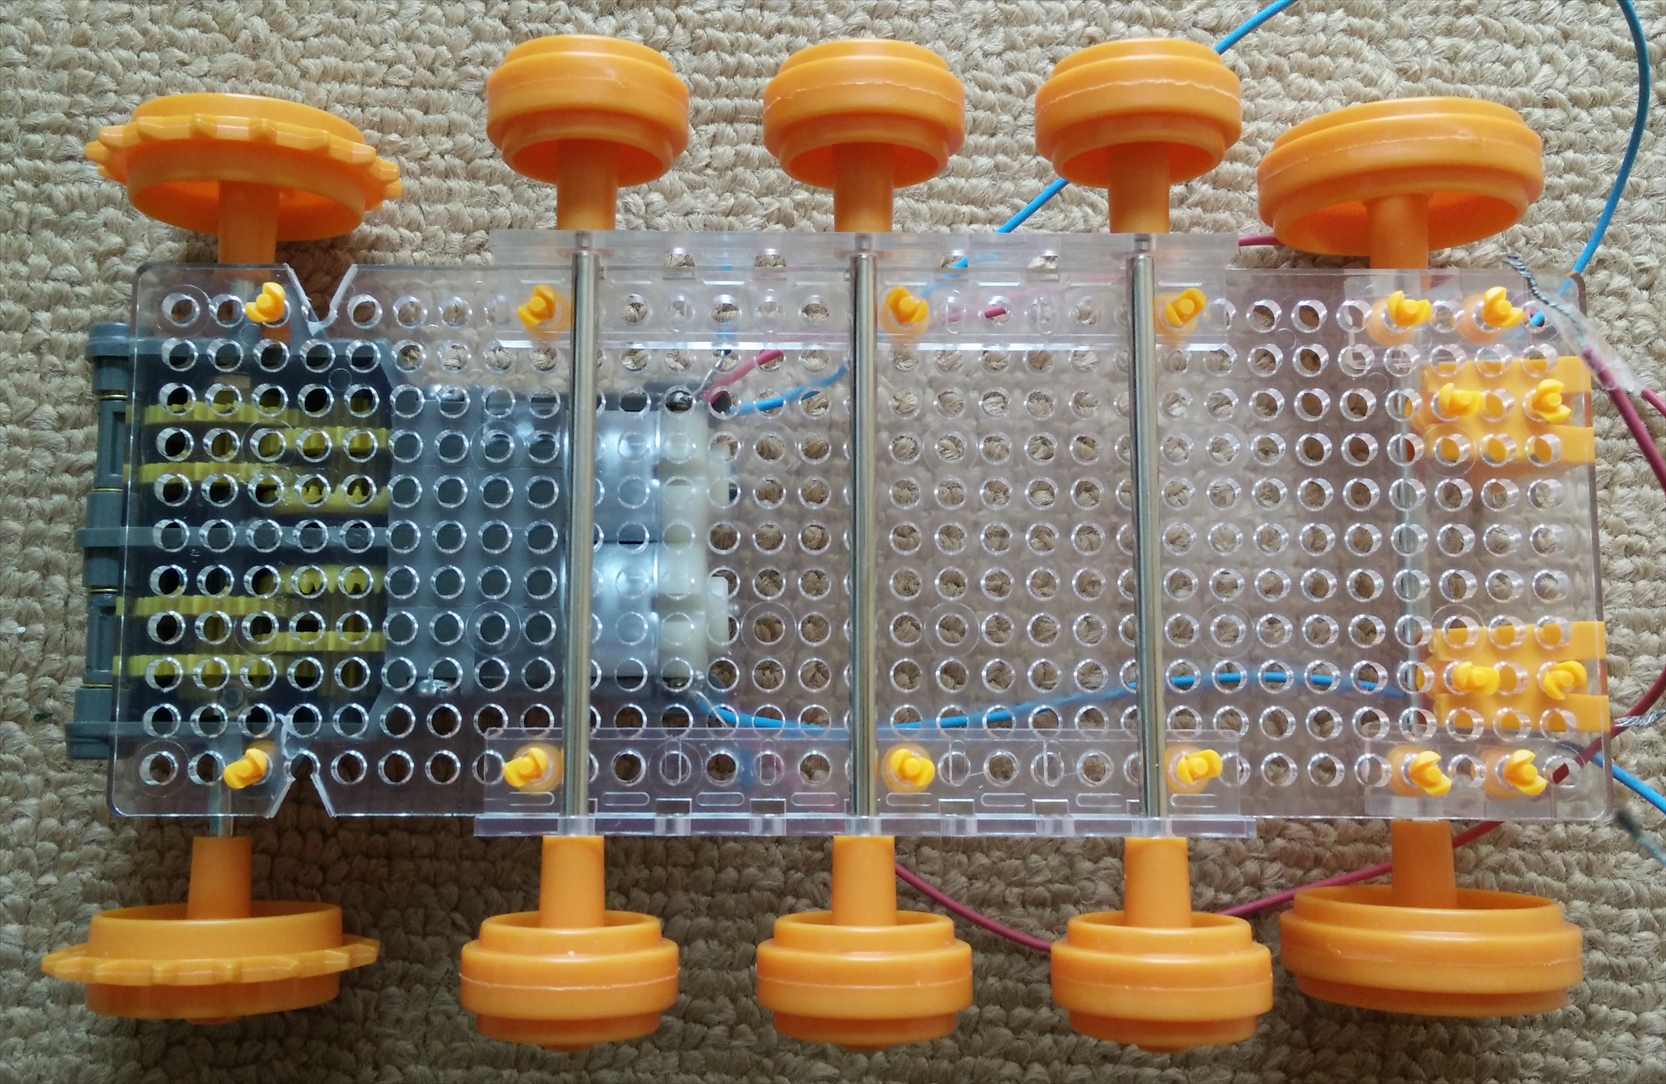 (ギアボックスを車体に取り付け:裏)
電池ボックスは輪ゴムで車体に固定した。
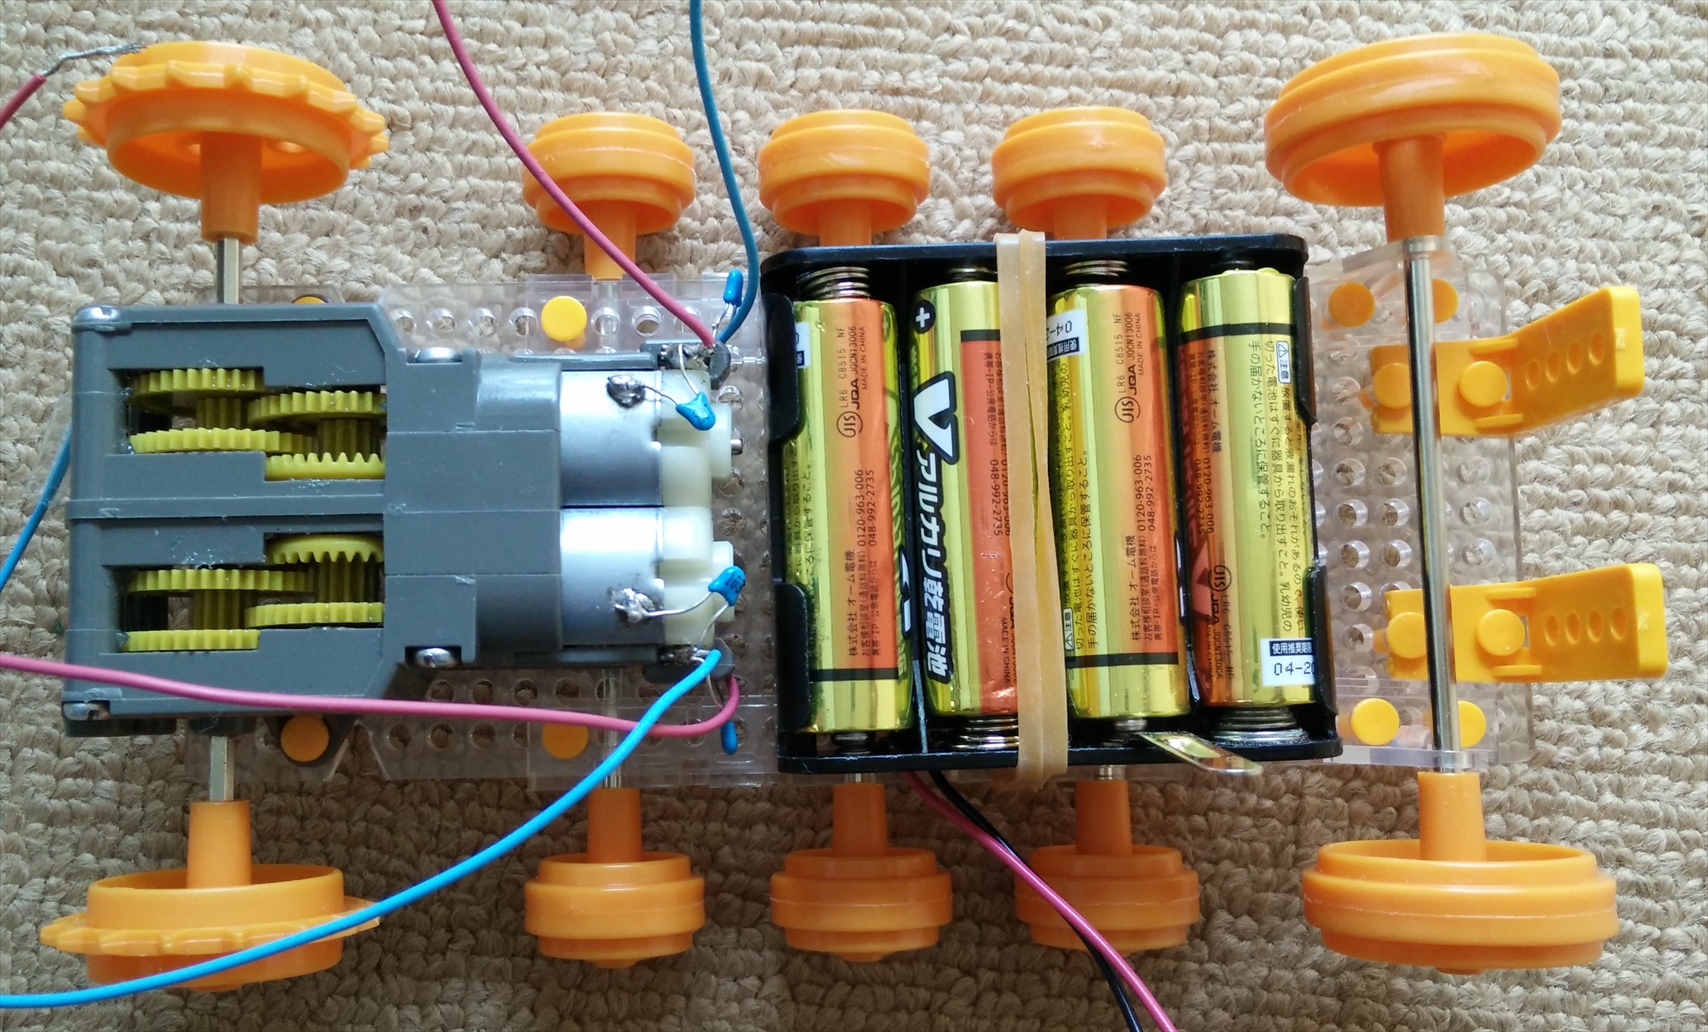 (電池ボックスを車体に取り付け:表)
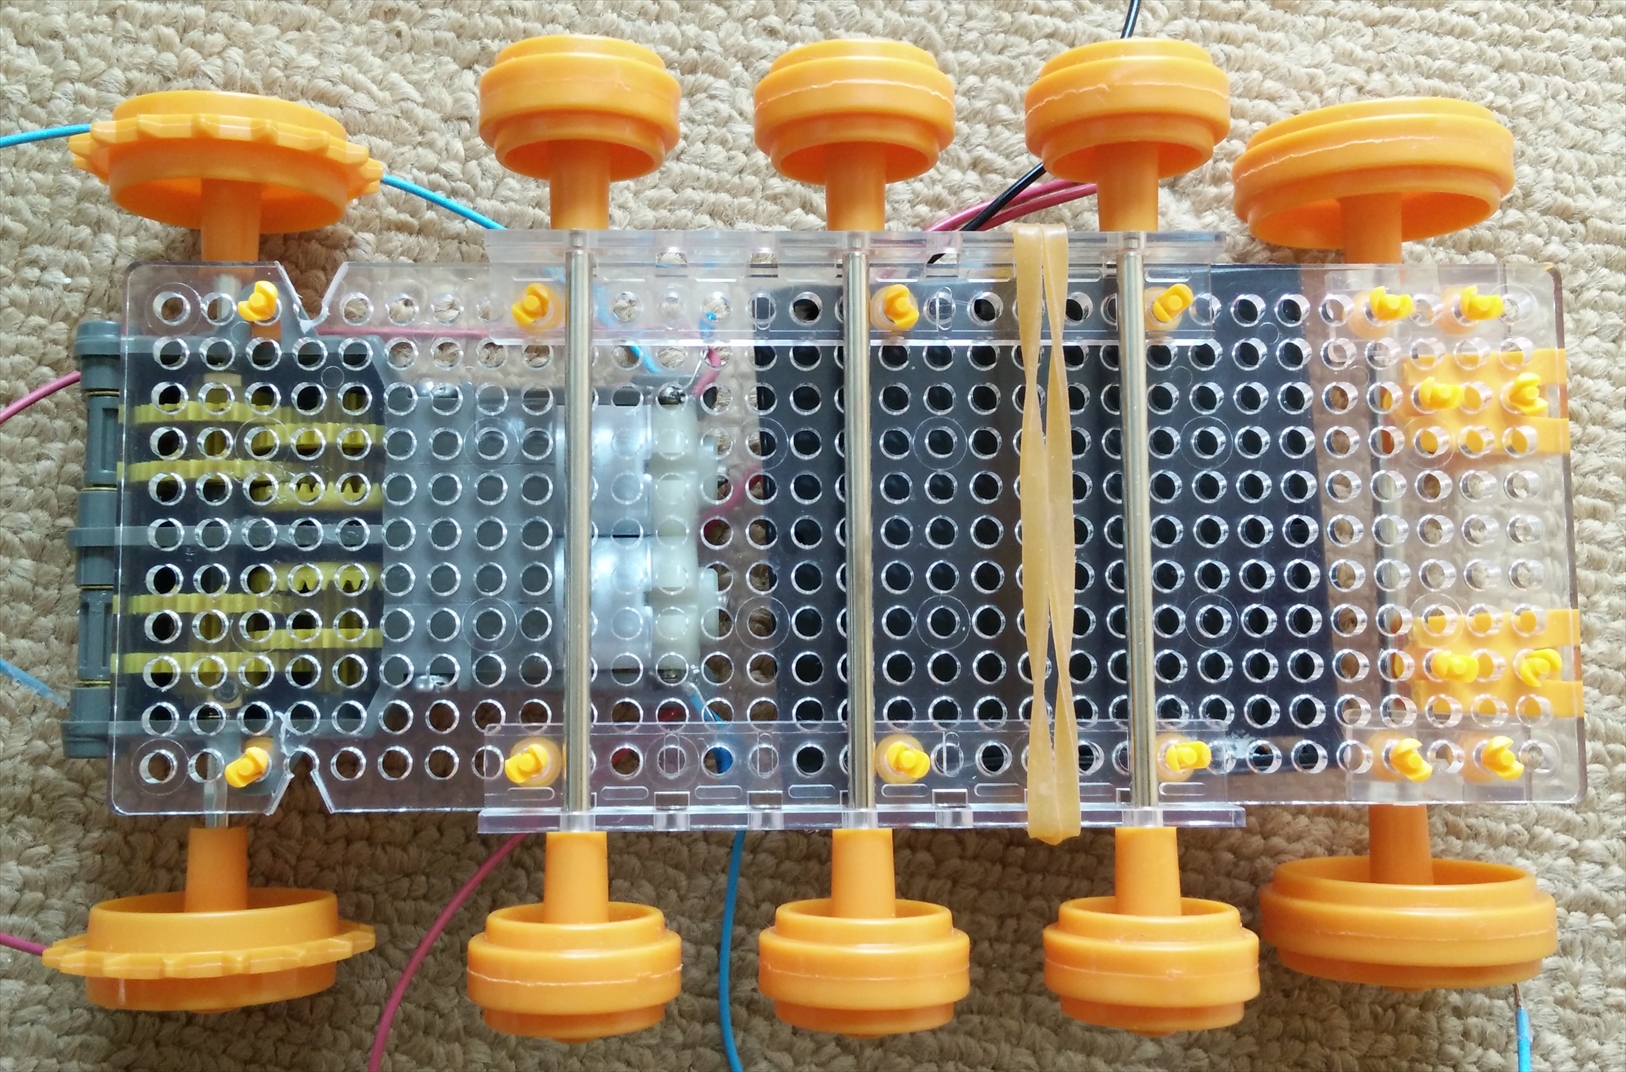 (電池ボックスを車体に取り付け:裏)
センサー類とArduino Uno互換機との配線
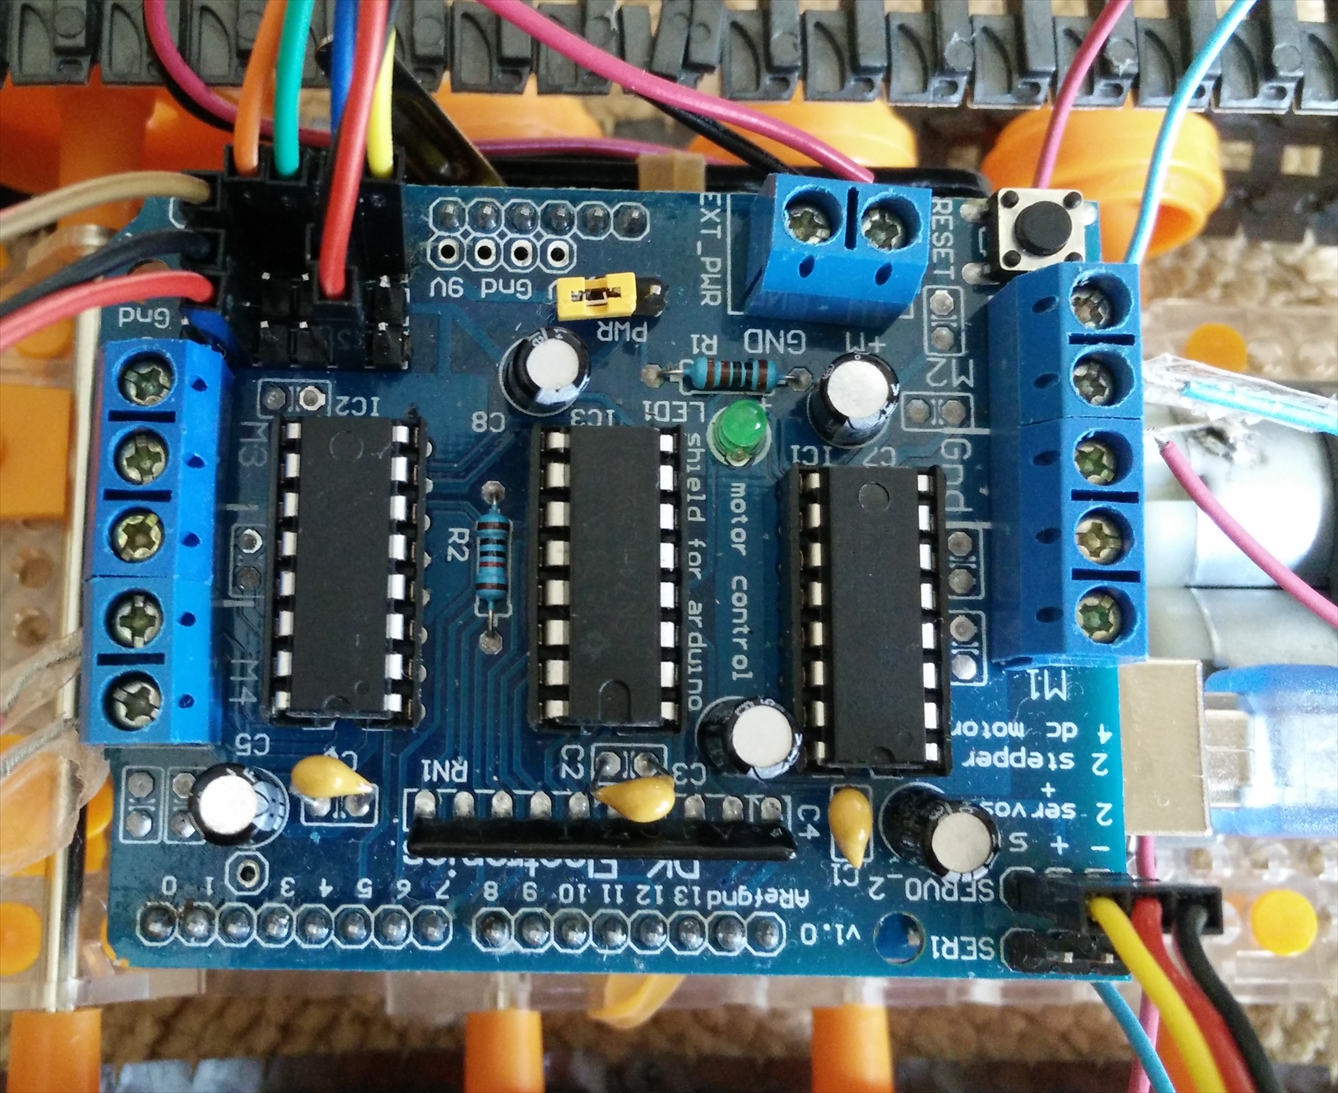
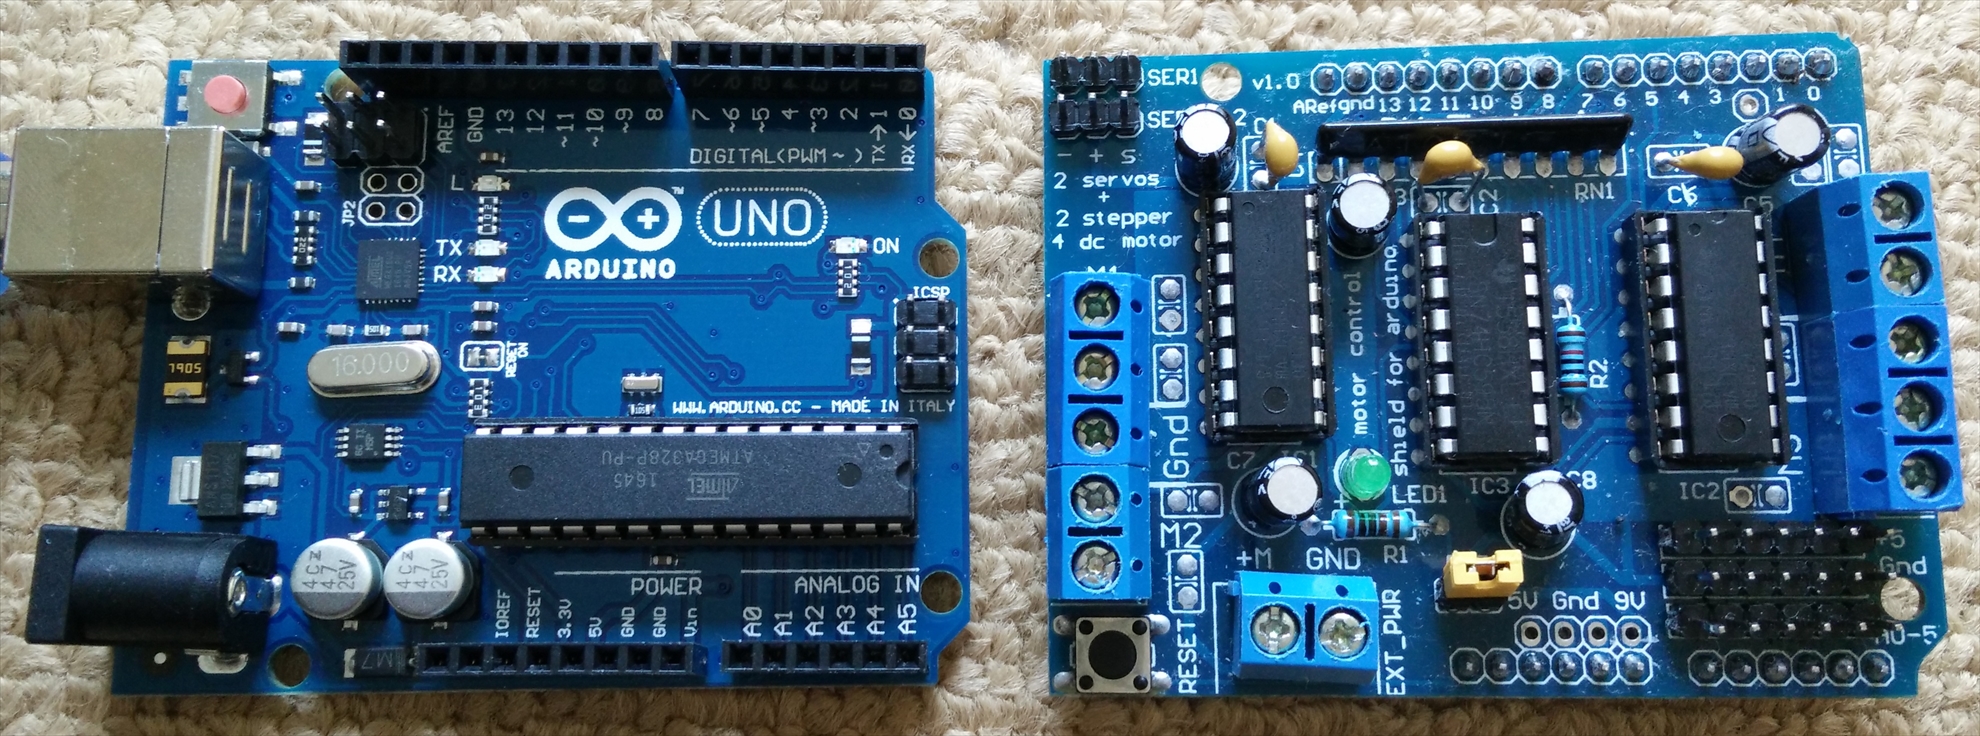 (Arduino Uno互換機とモーターシールド)
モーターシールドで外部電源を利用する場合には、ジャンパピンを外す必要があるらしい(画像ではなくさないように片側だけはずしてる)
 (Arduino Uno互換機へモーターシールドを取り付け)
サーボモータ(HS-422)はちょうど上手い具合に、ユニバーサルプレートに取り付けることができた(※SG90の場合も)。
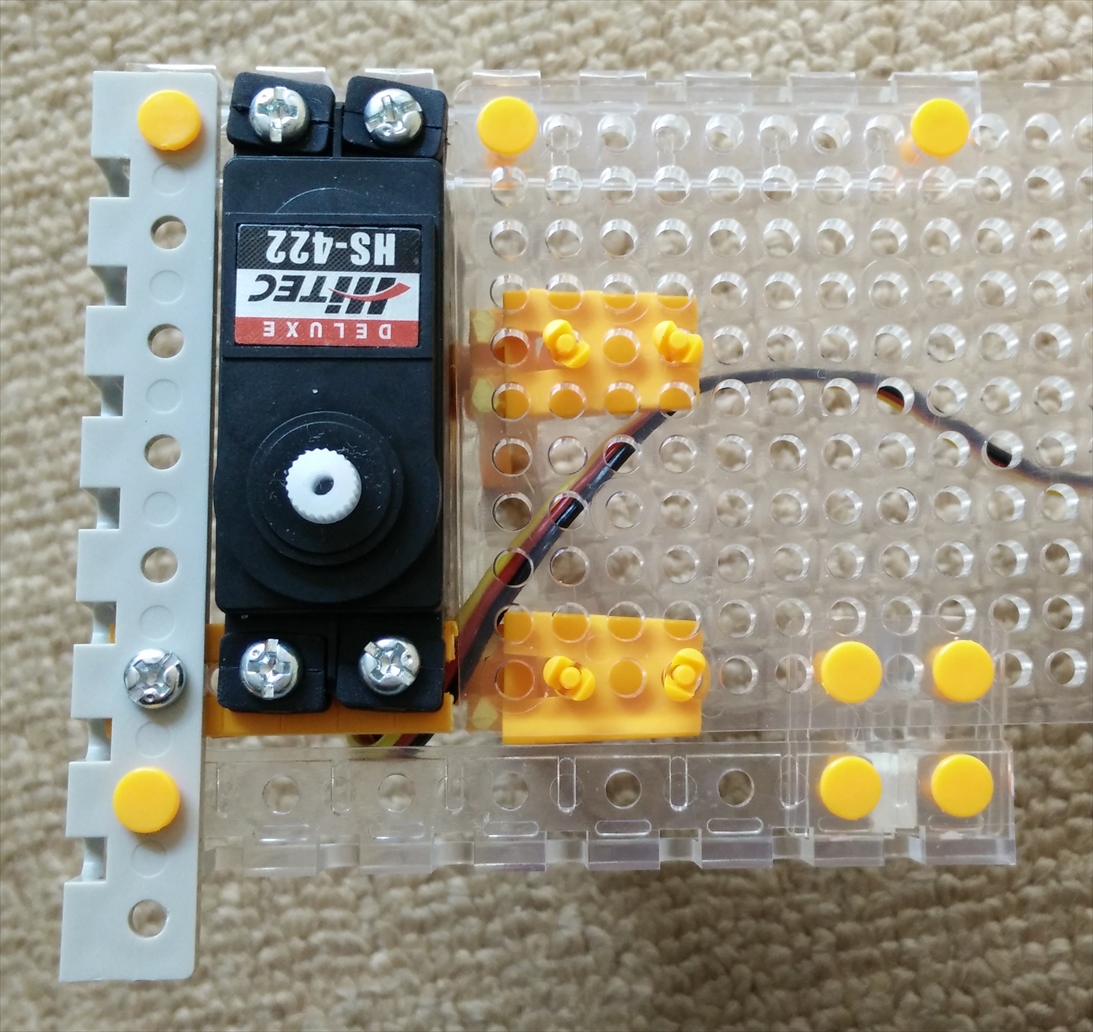 (サーボモータの取り付け:表)
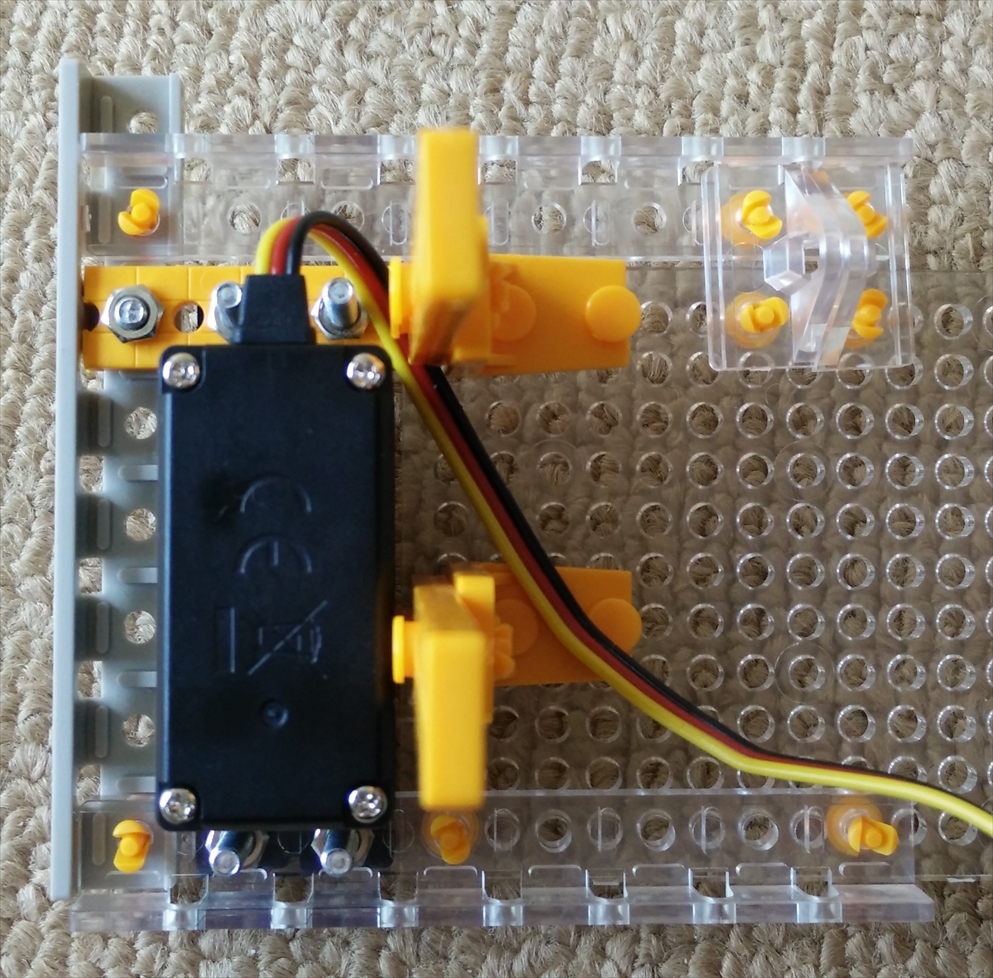 (サーボモータの取り付け:裏)
超音波センサとLEDはユニバーサル基板に半田付けし、赤外線近接センサは、セロテープで基板の裏に固定した。
同様に、サーボモータ用のアタッチメントも、基板の裏にセロテープで固定した。
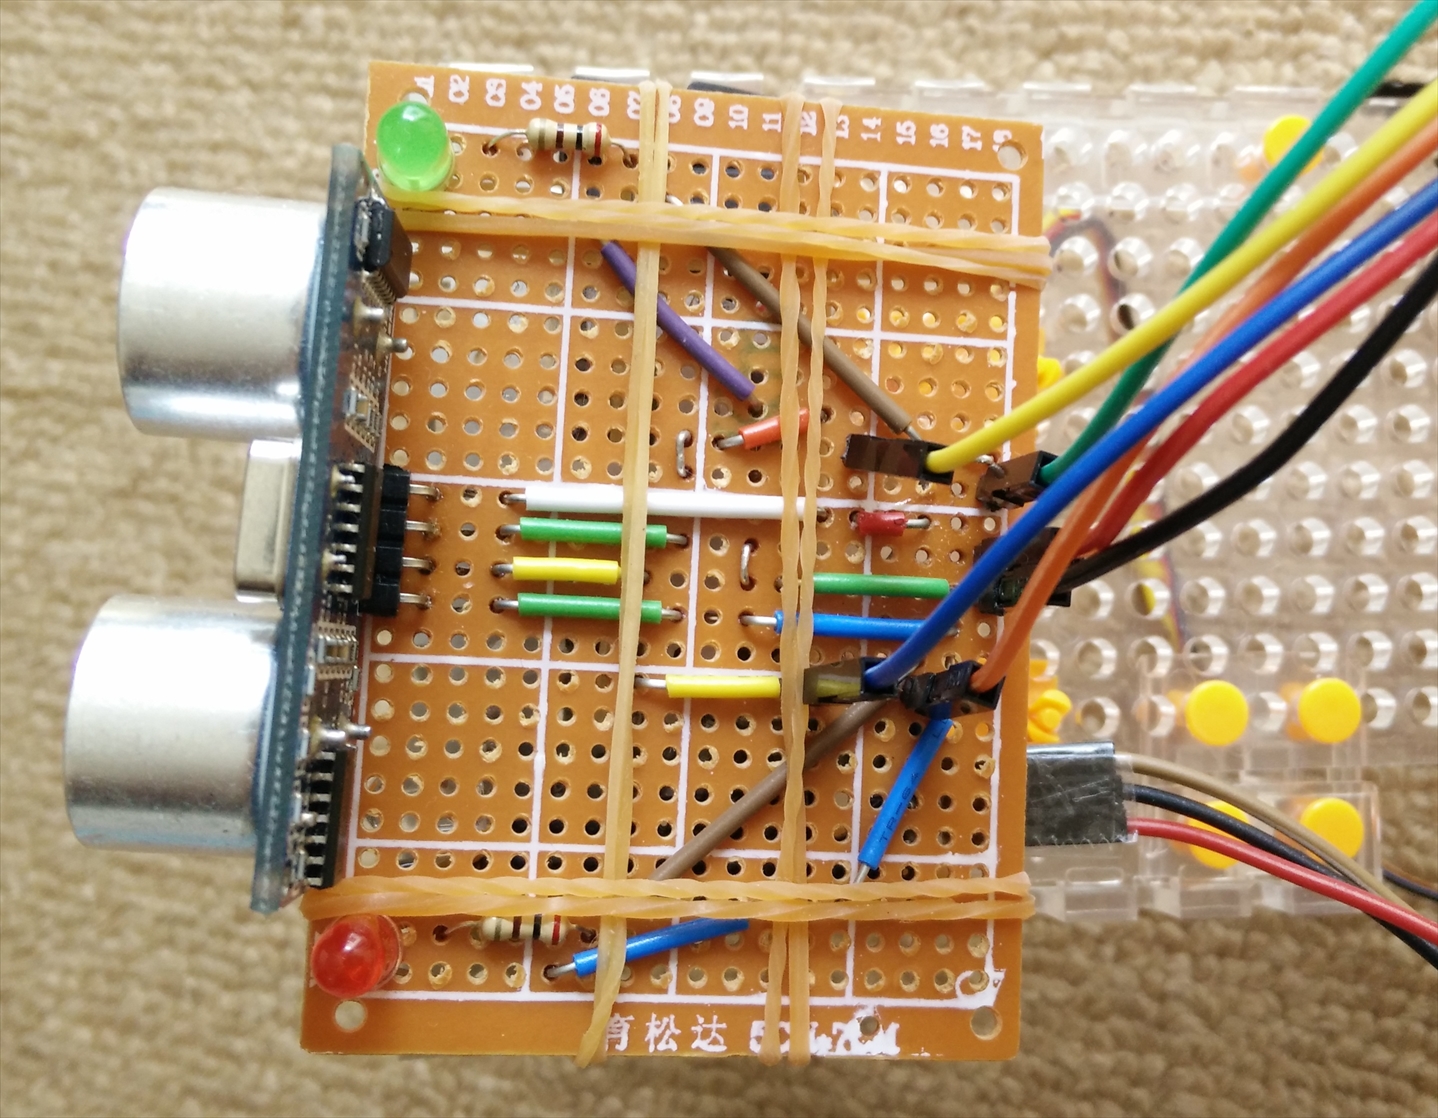
ユニバーサル基板(超音波距離センサ、LED)
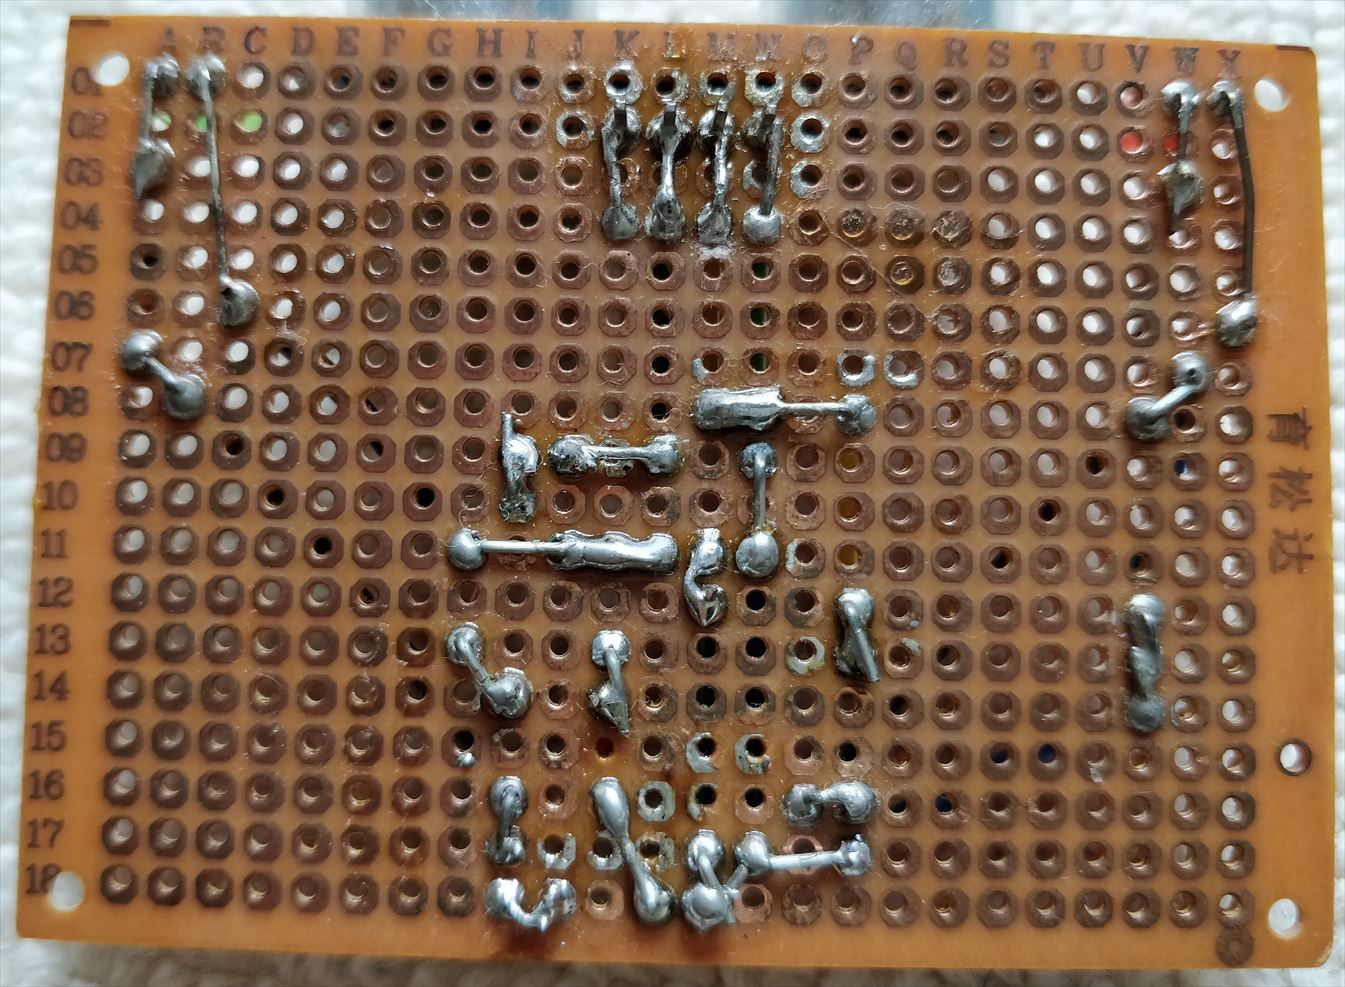
(ユニバーサル基板:裏)
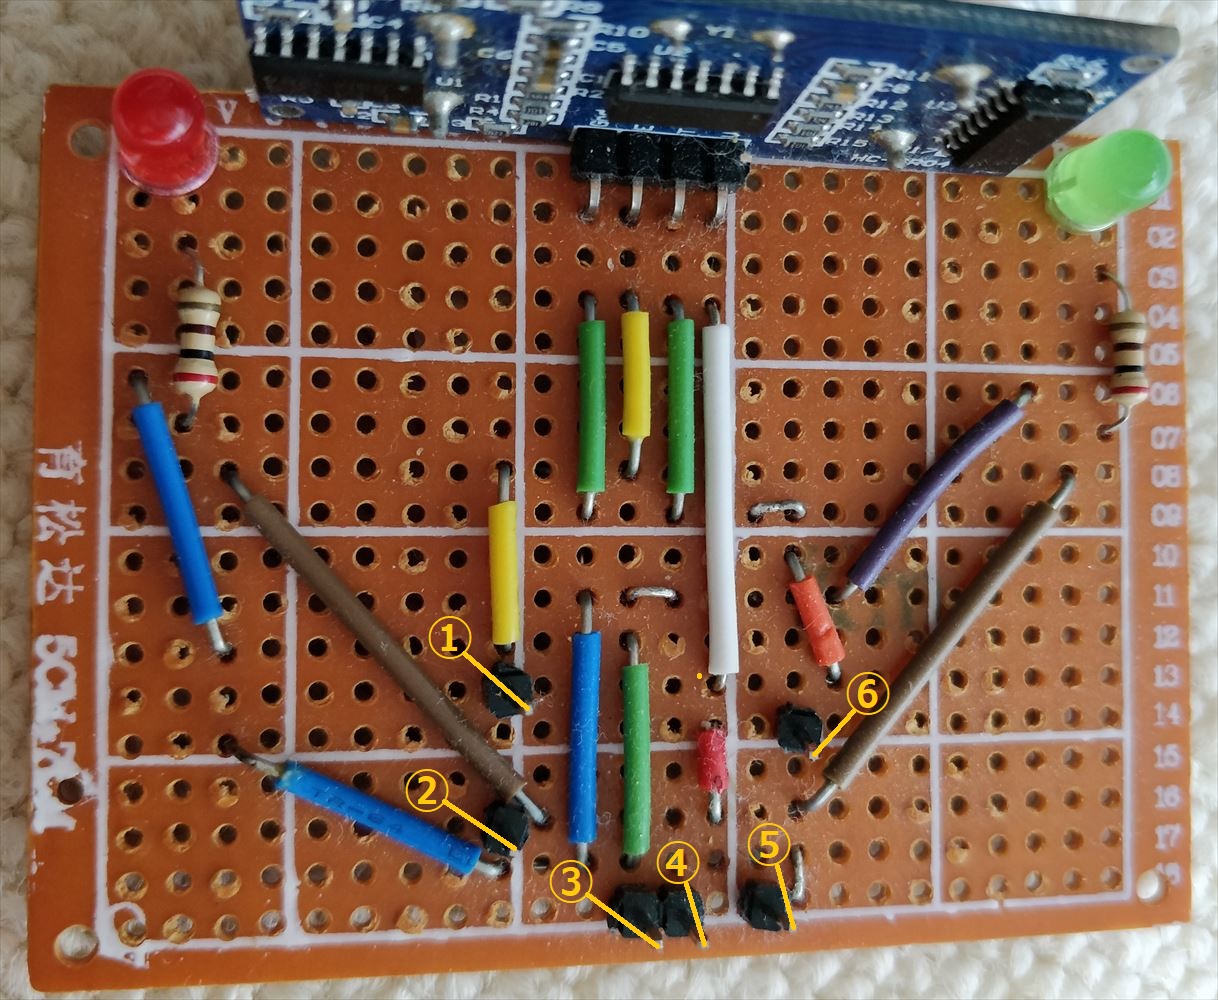
ユニバーサル基板(①:Echo、②:LED(赤)、③:Gnd、④:VCC、⑤:LED(緑)、⑥:Trig)
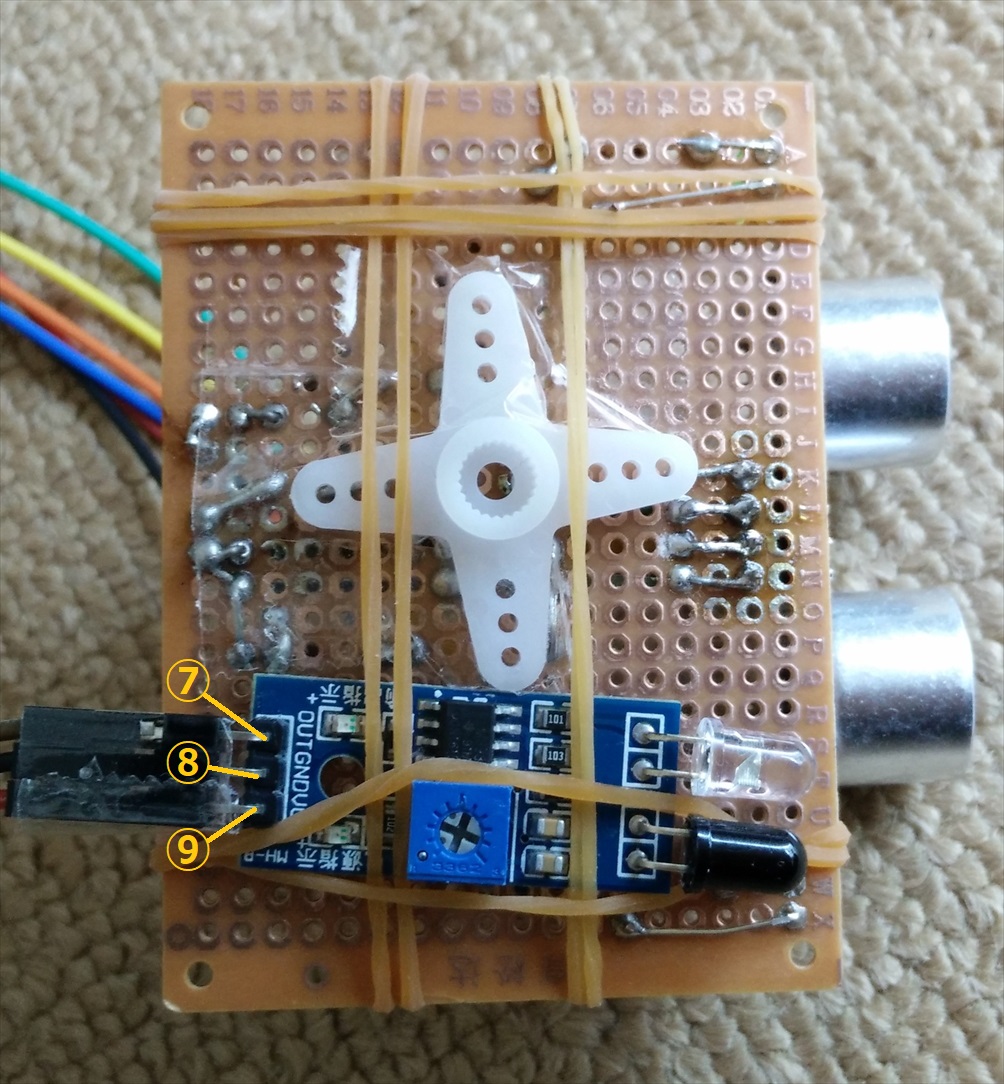
赤外線近接センサ(⑦:OUT、⑧:GND、⑨:VCC)
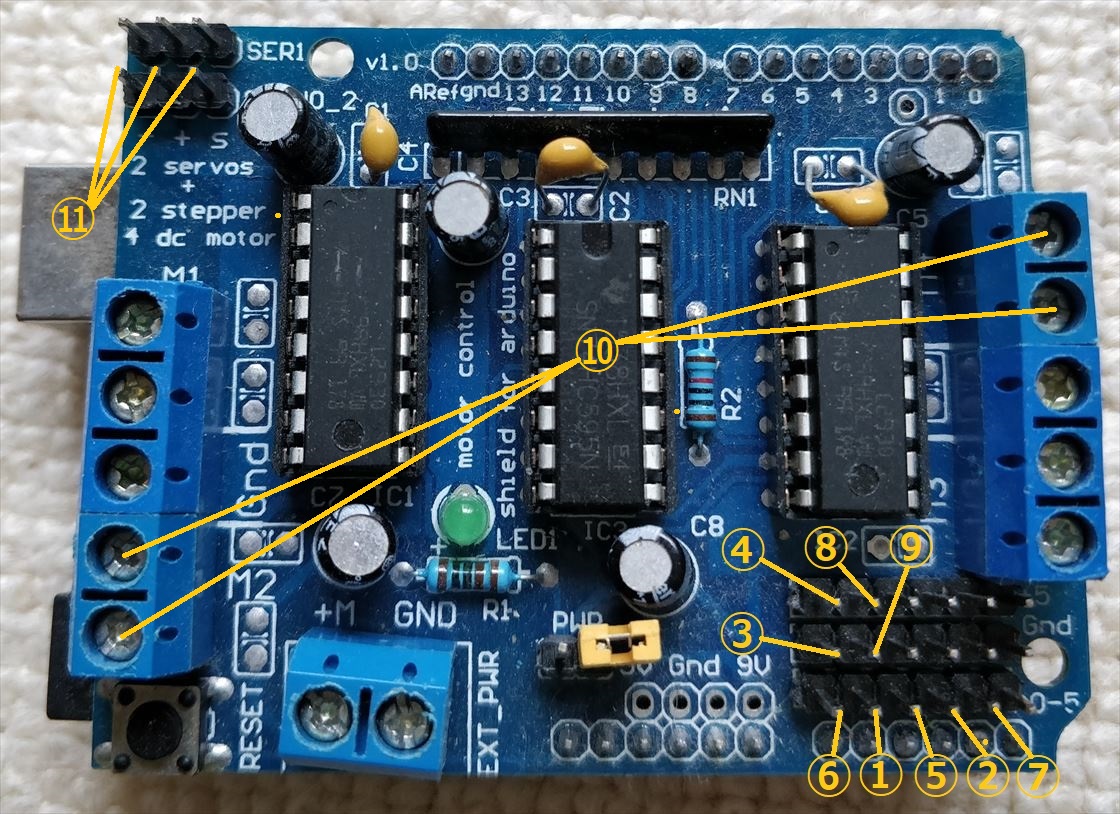
モーターシールド(①:Echo、②:LED(赤)、③:Gnd、④:VCC、⑤:LED(緑)、⑥:Trig、⑦:OUT、⑧:GND、⑨:VCC、⑩:モータ、⑪:サーボモータ)
モーターシールドを使用したので配線は少ないほうだが、モータードライバを使用する場合にはこれよりも配線が多くなる。
 (センサ類とArduino Uno互換機との配線)
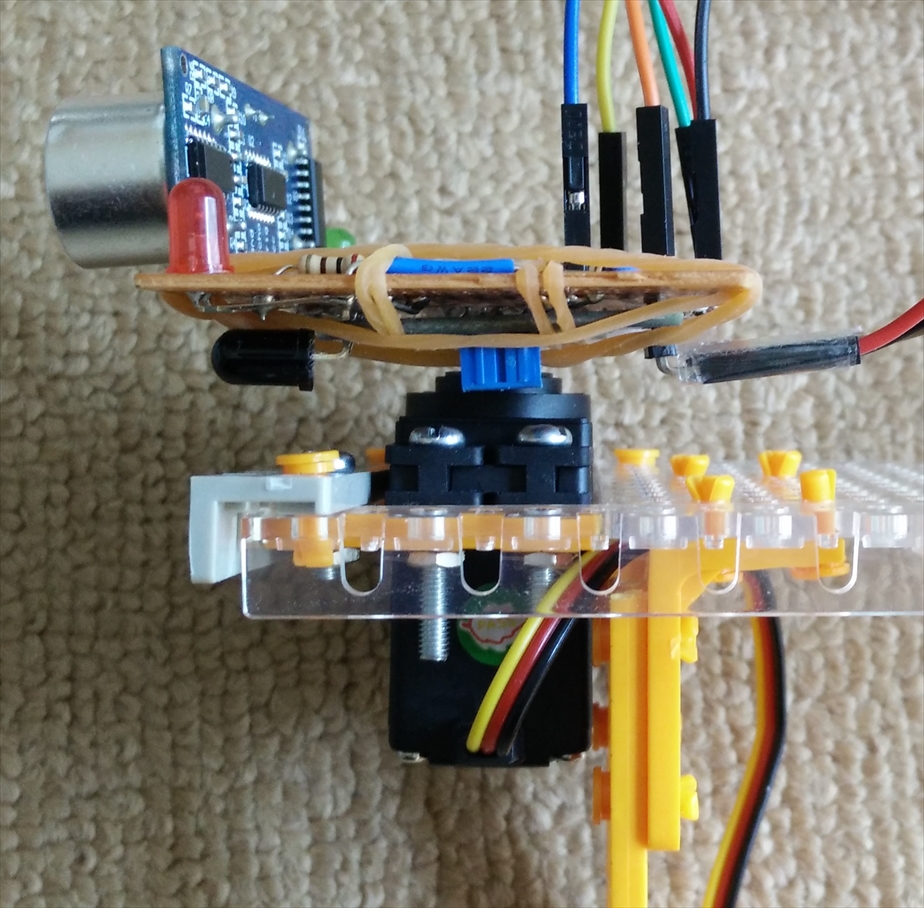 (センサ類の載った基板をサーボモータ上に固定)
最後に、サーボモータやセンサ類を載せたプレートを車体に固定する。
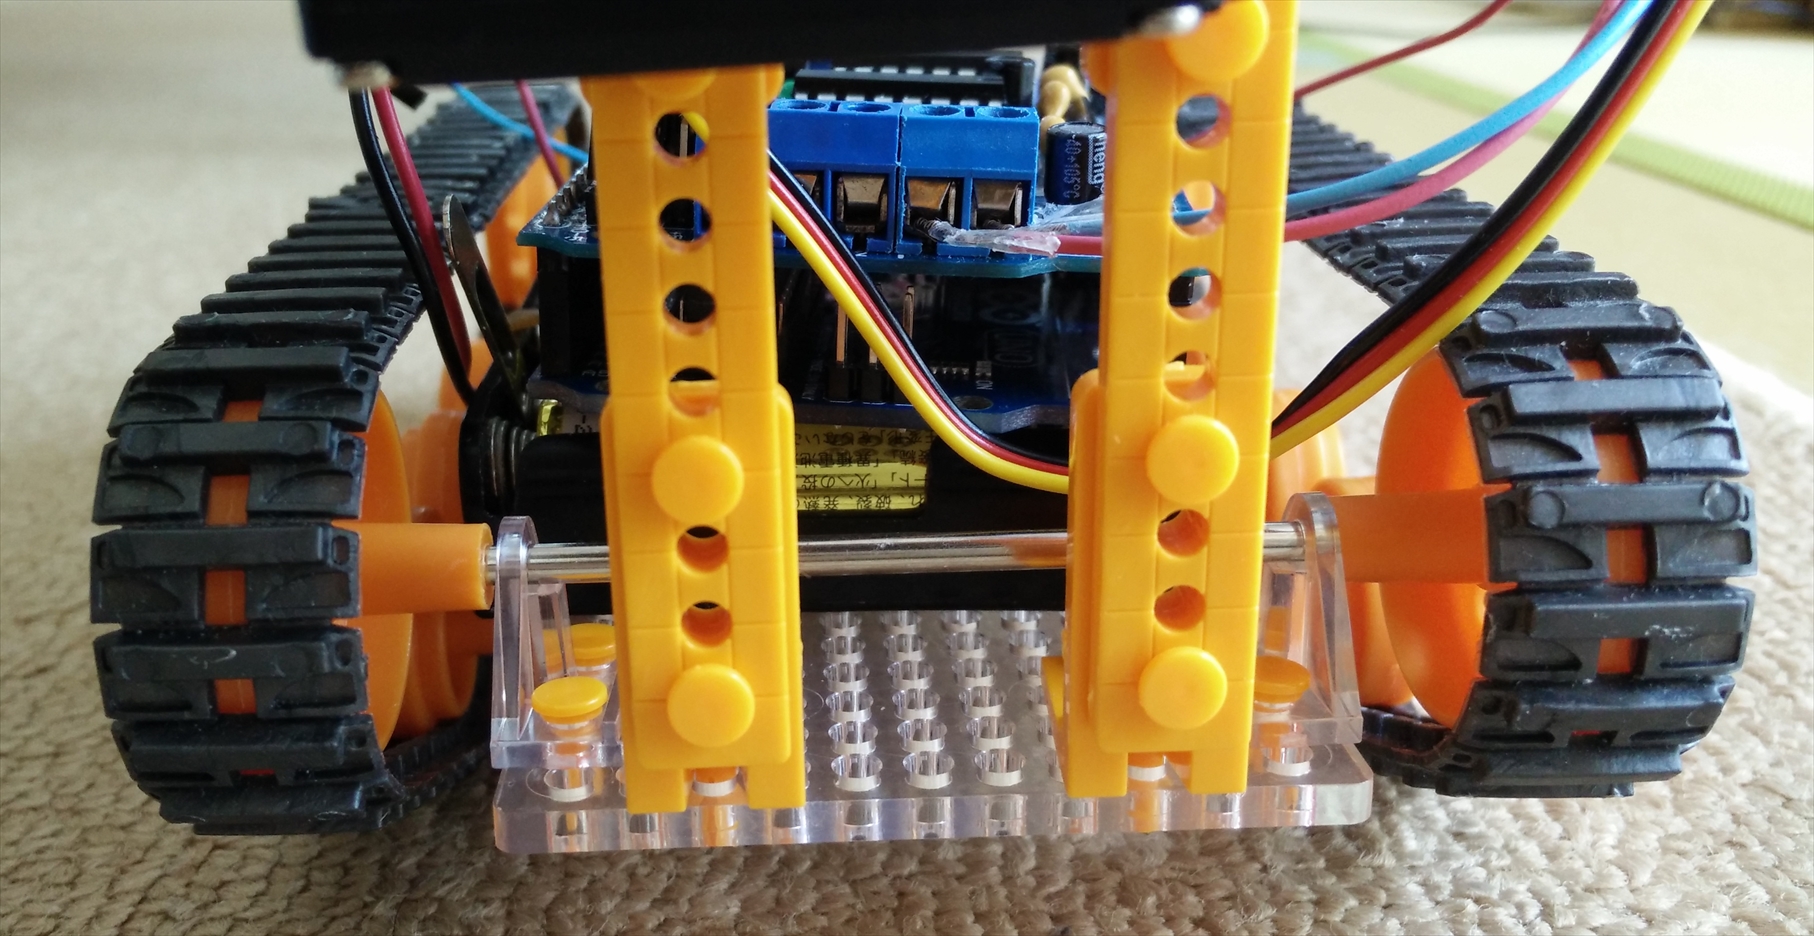 (サーボモータやセンサ類の載ったプレートを車体に固定)
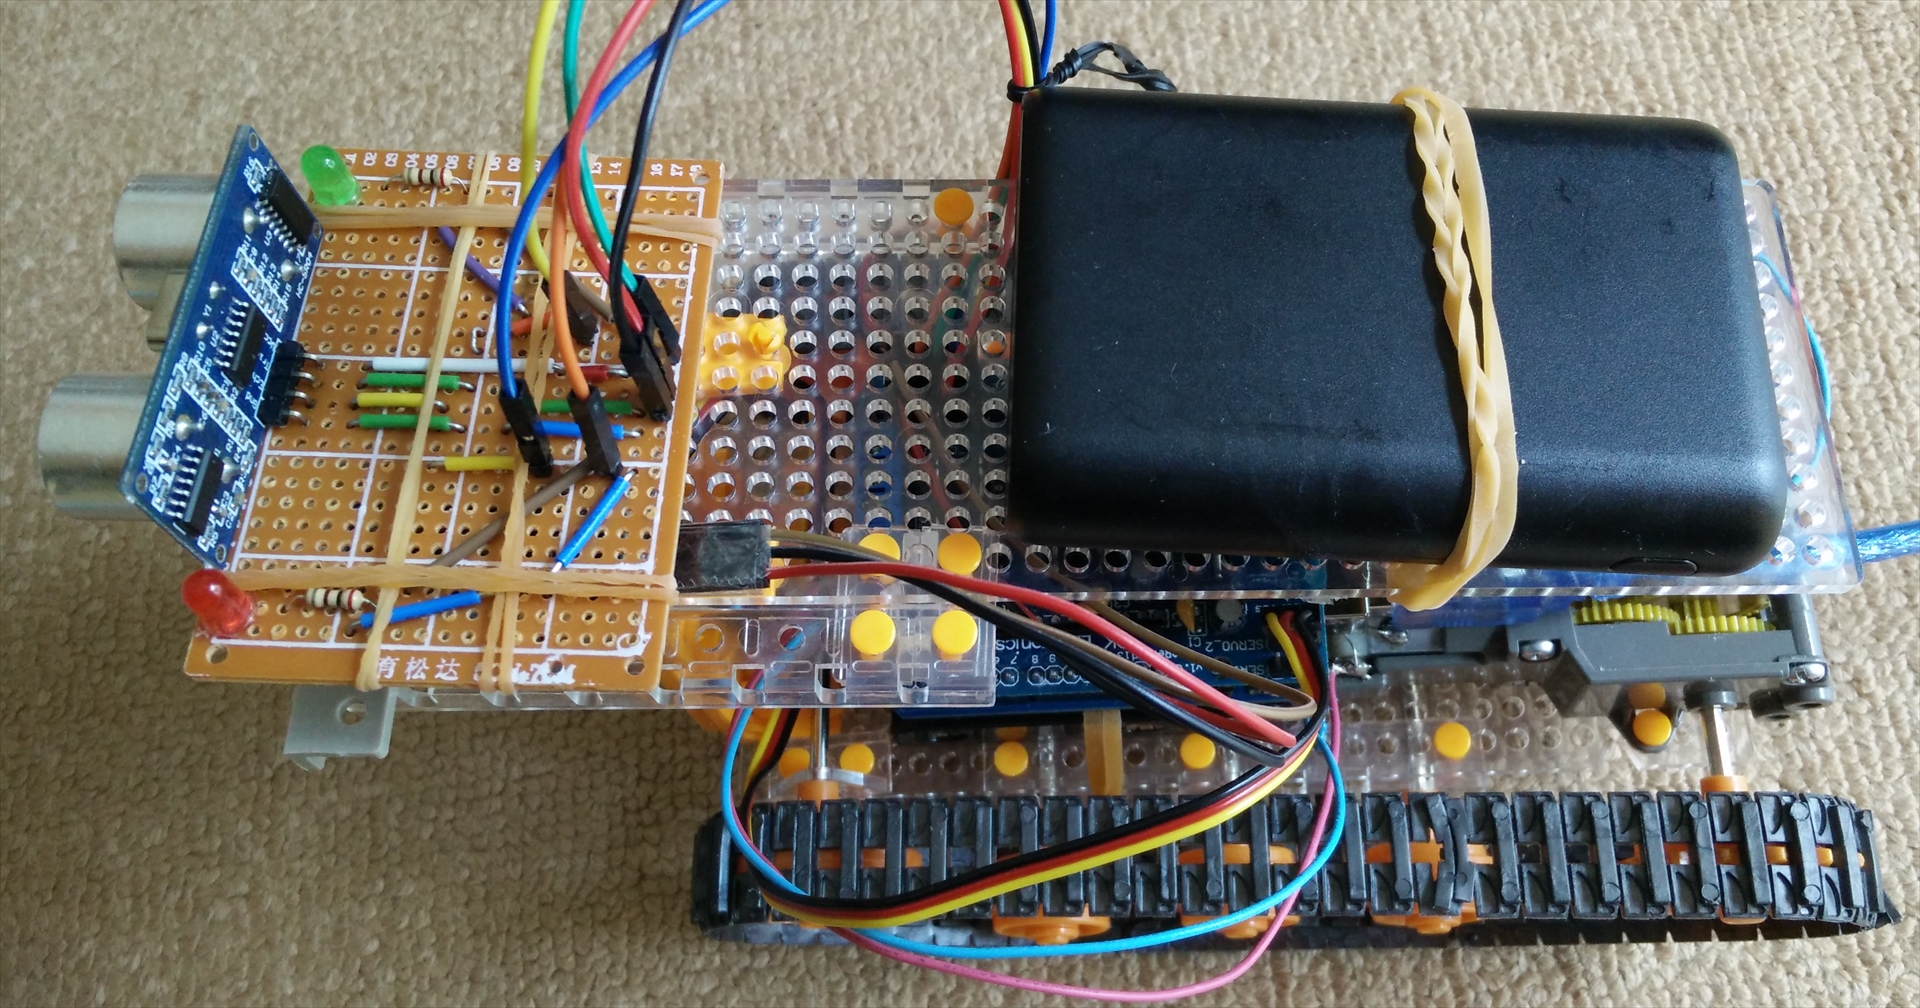
最後にモータ用の電源であるモバイルバッテリーを輪ゴムでプレートに固定して完成である。
(完成)
スケッチ(プログラム)
モーターシールド(L293D)を使用した場合と、他のモータードライバ(TA7291Pなど)を使用した場合のスケッチを紹介しておく。
※赤外線近接センサは未使用
モーターシールド(L293D)を使用する場合
モーターシールドを使用する場合、モーターの制御に「Afmotor.h」が必要となるので、GitHubからzipファイルをダウンロードし、Arduiono IDEで「スケッチ」→「ライブラリをインクルード」→「.ZIP形式のファイルをインストール」の順に実行し、「Afmotor.h」を使用できるようにする。
#include <AFMotor.h>
#include <Wire.h>
#include <Servo.h>
/*#include <skADT7410.h>*/  //温度センサ(ADT7410)を使用する場合

/*#define SENSOR_ADRS 0x48*/  //温度センサ(ADT7410)を使用する場合


AF_DCMotor motor_2(2, MOTOR12_64KHZ); // create motor #2, 64KHz pwm
AF_DCMotor motor_4(4, MOTOR12_64KHZ);
Servo myservo;  // create servo object to control a servo
/*skADT7410 Temp(SENSOR_ADRS);*/  //温度センサ(ADT7410)を使用する場合

const int trig = 14;
const int echo = 15;
const int greenLight = 16;
const int redLight = 17;
const int MH_sensor = 18;

int MH_value;
int position_of_myservo[] ={60, 45, 30, 15, 30, 45, 60, 90, 120, 135, 150, 165, 150, 135, 120, 90};
int len = sizeof(position_of_myservo) / sizeof(position_of_myservo[0]);
int interval;
double distance;
long randNumber;

void setup() {
  myservo.attach(9);
  myservo.write(90);
  pinMode(trig, OUTPUT);
  pinMode(echo, INPUT);
  pinMode(greenLight, OUTPUT);
  pinMode(redLight, OUTPUT);
  pinMode(MH_sensor, INPUT);
  Serial.begin(9600);
  Wire.begin();
  /*Temp.Begin();*/  //温度センサ(ADT7410)を使用する場合
}

void loop() {
  Serial.println("start");
   for (int i = 0; i < len; i++){
    myservo.write(position_of_myservo[i]);
    distance_from_object();
    /*+Serial.println(position_of_myservo[i]); //値の確認用
    Serial.print("distance: "); //値の確認用
    Serial.println(distance);*/  //値の確認用
    MH_value = digitalRead(MH_sensor);
    /*Serial.println(MH_value);*/  //値の確認用
    if (MH_value == 0 && distance < 8) {
      backward(150);
      turn(180);
    } else if (distance < 15) {
      if (position_of_myservo[i] > 90) {
        curve(170, 40);
        delay(500);
      } else {
        curve(40, 170);
        delay(500);
      }
    } else if (distance < 20) {
      if (position_of_myservo[i] > 90) {
        curve(160, 80);
        delay(500);
      } else {
        curve(80, 160);
        delay(500);
      }
    } else {
      forward(150);
    }
  }
}

void distance_from_object() {
  /*float temp;*/  //温度センサ(ADT7410)を使用する場合
  /*Temp.ActionMode(ADT_MODE_ONESHOT);*/  //温度センサ(ADT7410)を使用する場合
  Serial.read();

  // pulse !
  digitalWrite(trig, HIGH );
  delayMicroseconds(10);
  digitalWrite(trig, LOW );

  // mesure the interval
  interval = pulseIn( echo, HIGH );
  /*Temp.Read(&temp);*/  //温度センサ(ADT7410)を使用する場合
  /*float c = 20.055 * sqrt(temp + 273.15);*/  //温度センサ(ADT7410)を使用する場合
  distance = interval * 0.017;
  /*distance = interval * c / 20000;*/  //温度センサ(ADT7410)を使用する場合
  delay(75);
}

void forward(int x) {
  Serial.println("forward");
  digitalWrite(redLight, LOW);
  digitalWrite(greenLight, HIGH);
  motor_2.setSpeed(x);
  motor_4.setSpeed(x);
  motor_2.run(FORWARD);
  motor_4.run(FORWARD);
}

void backward(int x) {
  Serial.println("backward");
  for (int i = 0; i < 5; i++){
    digitalWrite(greenLight, LOW);
    digitalWrite(redLight, HIGH);
    motor_2.setSpeed(x);
    motor_4.setSpeed(x);
    motor_2.run(BACKWARD);
    motor_4.run(BACKWARD);
    delay(100);
    digitalWrite(redLight, LOW);
    motor_2.setSpeed(x);
    motor_4.setSpeed(x);
    motor_2.run(BACKWARD);
    motor_4.run(BACKWARD);
    delay(100);
  }
}

void turn(int x){
  motor_2.setSpeed(x);
  motor_4.setSpeed(x);
  randNumber = random(1, 3);
  if (!(randNumber == 1)){
    Serial.println("turn right");
    for (int i = 0; i < 5; i++){
      digitalWrite(greenLight, LOW);
      digitalWrite(redLight, HIGH);
      motor_2.run(BACKWARD);
      motor_4.run(FORWARD);
      delay(100);
      digitalWrite(redLight, LOW);
      motor_2.run(BACKWARD);
      motor_4.run(FORWARD);
      delay(100);
    }
  } else {
    Serial.println("turn left");
    for (int i = 0; i < 3; i++){
      digitalWrite(greenLight, LOW);
      digitalWrite(redLight, HIGH);
      motor_2.run(FORWARD);
      motor_4.run(BACKWARD);
      delay(100);
      digitalWrite(redLight, LOW);
      motor_2.run(FORWARD);
      motor_4.run(BACKWARD);
      delay(100);
    }
  }
}

void curve(int x, int y){
  Serial.println("curve");
  digitalWrite(greenLight, LOW);
  digitalWrite(redLight, HIGH);
  motor_2.setSpeed(x);
  motor_4.setSpeed(y);
  motor_2.run(FORWARD);
  motor_4.run(FORWARD);
}
モータードライバ(TA7291)を使用する場合
#include <Wire.h>
#include <Servo.h>
/*#include <skADT7410.h>*/ //温度センサ(ADT7410)を使用する場合

/*#define SENSOR_ADRS 0x48*/ //温度センサ(ADT7410)を使用する場合

Servo myservo;  // create servo object to control a servo
/*skADT7410 Temp(SENSOR_ADRS);*/ //温度センサ(ADT7410)を使用する場合

const int motorA_1 = 8;
const int motorA_2 = 9;
const int motorB_1 = 12;
const int motorB_2 = 13;
const int PWM_motorA = 10;
const int PWM_motorB = 11;

const int trig = 4;
const int echo = 5;
const int greenLight = 6;
const int redLight = 7;
const int MH_sensor = 2;

int MH_value;
int position_of_myservo[] ={65, 50, 35, 20, 35, 50, 65, 95, 125, 140, 155, 170, 155, 140, 125, 95};
int len = sizeof(position_of_myservo) / sizeof(position_of_myservo[0]);
int interval = 0;
double distance = 0;
long randNumber;

void setup() {
  myservo.attach(3);
  myservo.write(95);
  pinMode(motorA_1,OUTPUT);
  pinMode(motorA_2,OUTPUT);
  pinMode(motorB_1,OUTPUT);
  pinMode(motorB_2,OUTPUT);
  pinMode(trig, OUTPUT);
  pinMode(echo, INPUT);
  pinMode(greenLight, OUTPUT);
  pinMode(redLight, OUTPUT);
  Serial.begin(9600);
  Wire.begin();
  /*Temp.Begin();*/ //温度センサ(ADT7410)を使用する場合
}

void loop() {
  Serial.println("start");
  for (int i = 0; i < len; i++){
    myservo.write(position_of_myservo[i]);
    distance_from_object();
    /*+Serial.println(position_of_myservo[i]); //値の確認用
    Serial.print("distance: "); //値の確認用
    Serial.println(distance);*/ //値の確認用
    MH_value = digitalRead(MH_sensor);
    /*Serial.println(MH_value);*/ //値の確認用
    if (MH_value == 0 && distance < 8) {
      randNumber = random(1, 3);
      if (!(randNumber == 1)){
        backward(150);
        turn_right(180);
      } else {
        backward(150);
        turn_left(180);
      }
    } else if (distance < 15) {
      if (position_of_myservo[i] > 90) {
        curve(170, 40);
        delay(500);
      } else {
        curve(40, 170);
        delay(500);
      }
    } else if (distance < 20) {
      if (position_of_myservo[i] > 90) {
        curve(160, 80);
        delay(500);
      } else {
        curve(80, 160);
        delay(500);
      }
    } else {
      forward(150);
    }
  }
}

void distance_from_object() {
  /*float temp;*/ //温度センサ(ADT7410)を使用する場合
  /*Temp.ActionMode(ADT_MODE_ONESHOT);*/ //温度センサ(ADT7410)を使用する場合
  Serial.read();

  // pulse !
  digitalWrite(trig, HIGH );
  delayMicroseconds(10);
  digitalWrite(trig, LOW );

  // mesure the interval
  interval = pulseIn( echo, HIGH );
  /*Temp.Read(&temp);*/ //温度センサ(ADT7410)を使用する場合
  /*float c = 20.055 * sqrt(temp + 273.15);*/ //温度センサ(ADT7410)を使用する場合
  distance = interval * 0.017;
  /*distance = interval * c / 20000;*/ //温度センサ(ADT7410)を使用する場合
  delay(75);
}

void forward(int x) {
  Serial.println("forward");
  digitalWrite(redLight, LOW);
  digitalWrite(greenLight, HIGH);
  analogWrite(PWM_motorA, x);
  analogWrite(PWM_motorB, x);
  digitalWrite(motorA_1, LOW);
  digitalWrite(motorA_2, HIGH);
  digitalWrite(motorB_1, LOW);
  digitalWrite(motorB_2, HIGH);
}

void backward(int x) {
  Serial.println("backward");
  digitalWrite(greenLight, LOW);
  for (int i = 0; i < 5; i++){
    analogWrite(PWM_motorA, x);
    analogWrite(PWM_motorB, x);
    digitalWrite(redLight, HIGH);
    digitalWrite(motorA_1, HIGH);
    digitalWrite(motorA_2, LOW);
    digitalWrite(motorB_1, HIGH);
    digitalWrite(motorB_2, LOW);
    delay(100);
    digitalWrite(redLight, LOW);
    digitalWrite(motorA_1, HIGH);
    digitalWrite(motorA_2, LOW);
    digitalWrite(motorB_1, HIGH);
    digitalWrite(motorB_2, LOW);
    delay(100);
  }
}

void turn_right(int x){
  Serial.println("turn right");
  digitalWrite(greenLight, LOW);
  for (int i = 0; i < 2; i++){
    analogWrite(PWM_motorA, x);
    analogWrite(PWM_motorB, x);
    digitalWrite(redLight, HIGH);
    digitalWrite(motorA_1, LOW);
    digitalWrite(motorA_2, HIGH);
    digitalWrite(motorB_1, HIGH);
    digitalWrite(motorB_2, LOW);
    delay(210);
    digitalWrite(redLight, LOW);
    digitalWrite(motorA_1, LOW);
    digitalWrite(motorA_2, HIGH);
    digitalWrite(motorB_1, HIGH);
    digitalWrite(motorB_2, LOW);
    delay(210);
  }
}

void turn_left(int x){
  Serial.println("turn left");
  digitalWrite(greenLight, LOW);
  for (int i = 0; i < 2; i++){
    analogWrite(PWM_motorA, x);
    analogWrite(PWM_motorB, x);
    digitalWrite(redLight, HIGH);
    digitalWrite(motorA_1, HIGH);
    digitalWrite(motorA_2, LOW);
    digitalWrite(motorB_1, LOW);
    digitalWrite(motorB_2, HIGH);
    delay(210);
    digitalWrite(redLight, LOW);
    digitalWrite(redLight, HIGH);
    digitalWrite(motorA_1, HIGH);
    digitalWrite(motorA_2, LOW);
    digitalWrite(motorB_1, LOW);
    digitalWrite(motorB_2, HIGH);
    delay(210);
  }
}

void curve (int x, int y){
  Serial.println("curve");
  digitalWrite(greenLight, LOW);
  digitalWrite(redLight, HIGH);
  analogWrite(PWM_motorA, x);
  analogWrite(PWM_motorB, y);
  digitalWrite(motorA_1, LOW);
  digitalWrite(motorA_2, HIGH);
  digitalWrite(motorB_1, LOW);
  digitalWrite(motorB_2, HIGH);
}
まとめ
- 障害物を避けて走るクローラー車を作った
- 割りと上手く動作したが、モーターにはノイズ対策が必要である
- 次は、ジャイロセンサを使って倒立振子を作るのに挑戦する
お世話になります。遠藤と申します。『Arduino Uno互換機で障害物を避けて走るクローラー車を作った』の記事の中の動画を見させて頂き、大変衝撃を受けました、まさにAIが搭載されたクローラーのようで、ここまで出来るのかととても感動しました。
早速、記事に載っていたパーツを購入し、組み立てていましたが、ユニバーサル基盤部分やその他の配線方法が分からず、困ってしまいました。
色々なサイトや書庫を見てみましたがどうもわかりません。
もし宜しければ配線図や配線の画像等、又は参考になる物などをご教授頂けないでしょうか。
記事中に、ユニバーサル基板とモータードライブシールドの配線の対応が分かるような画像と、モーターとモータードライブシールドの配線の対応が分かるような画像を追加しました。
参考にしてみて下さい。
迅速な回答、及び配線が分かる画像のUPの対応を頂きありがとうございました。
早速、ユニバーサル基盤の半田及び配線を実施しました。
なかなかまとまった時間が取れないので、残りの配線は少しづつ進めてみます。
ありがとうございました。
お世話になります。松林と申します。『Arduino Uno互換機で障害物を避けて走るクローラー車を作った』の動画を見させて頂き、とても衝撃を受けました。
なので自分も作ってみたいと思い、今作っていて、モーターシールドのプログラムをArduinoに入れようと思ったんですけどコンパイルエラーとでてしまったんですが、なぜですかね?
大変申し訳ないですが、もう一度プログラムを送っていただくことはできますでしょうか。
宜しくお願い致します。
先ほど試してみたところ、私の方は問題なくスケッチを書き込めましたので、エラー内容をお知らせください。
また、モーターシールド(L293D)版とモータードライバ(TA7291)版、どちらのスケッチでエラーが出ているのかについても合わせてお知らせください。
返信遅れてすみません。
下記がエラーメッセージです。
ご確認の方よろしくお願いします
Arduino:1.8.1 (Windows 10), ボード:”Arduino/Genuino Uno”
C:\Users\Student\Documents\Arduino\sketch_sep07a\sketch_sep07a.ino:1:21: fatal error: Afmotor.h: No such file or directory
#include
^
compilation terminated.
exit status 1
ボードArduino/Genuino Unoに対するコンパイル時にエラーが発生しました。
モーターシールドを使用する場合、モーター制御に「Afmotor.h」が必要なので
https://github.com/adafruit/Adafruit-Motor-Shield-library
からzipファイルをダウンロードし、Arduiono IDEで「スケッチ」→「ライブラリをインクルード」→「.ZIP形式のファイルをインストール」の順に実行してください。
返信遅れてすみません
プログラム入れることは無事できました。ありがとうございました。
ですが実際に動かしてみた所、動きはするのですが決まった動きを繰り返すのですがどうしたら動画のような動きになるのでしょうか。
確認した方が良いところなど教えてくださったら嬉しいです。
お願いします。
もし赤外線センサを接続していないのであれば、それが原因ですので、赤外線センサを接続してください。
赤外線センサの接続については、配線を本文の画像に追記しているので、そちらをご参照ください。
また、もし赤外線センサを接続していて、上手く動作しないのなら、配線の誤りが考えられます。
ありがとうございました。上手く動くようになりました。ですが、障害物を見つけてセンサーは反応するのですが避けるのが少ししか避けず障害物を避けきれないのですが何か改善できる事があるのならば教えていただきたいです。
回答の方お願いします。
現在66才の私ですが、『Arduino Uno互換機で障害物を避けて走るクローラー車を作った』のホームページを拝見し、少し前に購入したモーターシールドの使い方が分かりました。
早速、手持ちの部品でホームページの記事を参考にクローラーを作り始めました。動力の部分以外の配線が完了して電源を供給したら、動画の様なサーボモーターの動きに感動しました。
まだスケッチの内容は理解していませんが、取り合えず完成に向けて頑張ります。
ホームページへ開示して頂き本当にありがとうございました。
私も役立つ趣味のホームページが開示できるように頑張っています。